 COPIER
How to Scan Film Negatives With Your Phone
To scan film negatives with your phone, put the negative on an even white light, such as a tablet showing a blank white screen or an LED light pad, hold the phone level above it, take the photo, and then invert it into a positive in an app or editor. The setup costs little or nothing, and with care the results are good enough to share and to make small prints.
A document scanner app isn’t the right tool for this. Scanner apps expect paper lit from the front; negatives need light coming through them from behind, and the image needs to be inverted. Copier is a document scanner, so it doesn’t do this either. The steps below use the tools that do.
What you need
You can do this with things you already own:
| Item | Free option | Small upgrade |
|---|---|---|
| Light source | A tablet or spare phone showing a white image at full brightness | An LED tracing light pad |
| Film holder | Two strips of black card with a window cut out, or a slide mount | A 35mm or 120 film holder made for copy scanning |
| Phone support | A stack of books with the phone across the top | A copy stand or an overhead phone arm |
| Dust removal | A soft brush | A rubber air blower and cotton gloves |
| Inverting | A photo editor with a tone curve (Lightroom mobile) | A film app such as FilmLab or FilmBox by Photomyne |
On a tablet, don’t lay the film straight on the glass. At close range the phone can pick up the screen’s pixel grid through the film. Raising the negative a centimeter or two blurs that pattern away.
How to set it up
The negative sits on a small holder above the light, with the phone held level above that.
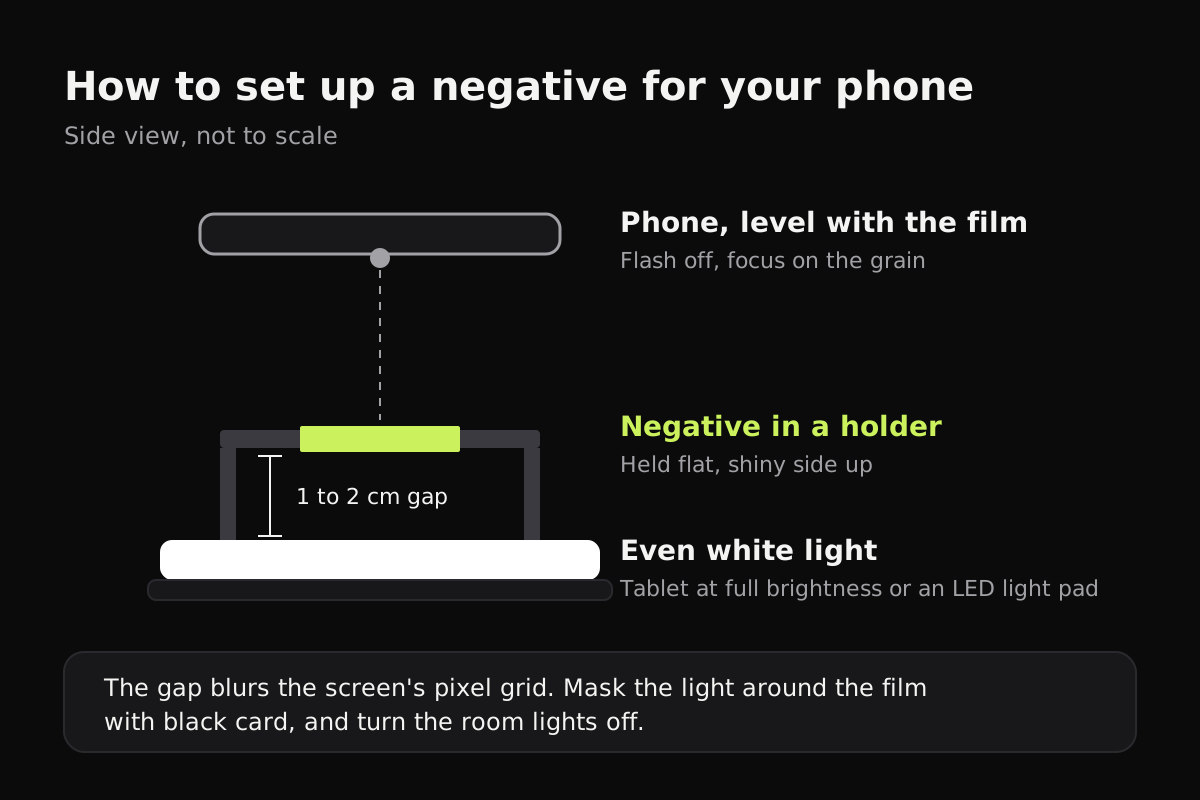
- Darken the room. Overhead lights reflect off the shiny side of the film and lower the contrast.
- Set the light source to plain white at full brightness. On a tablet, open a blank white image, turn off night shift or blue-light filters, and turn off auto-brightness.
- Mask around the frame. Cover the light around the negative with black card so only light passing through the film reaches the camera.
- Put the film in the holder shiny side up. Looking at the shiny base side, the image reads the right way around, not mirrored.
- Blow dust off with an air blower. Every speck shows up as a white spot after inverting.
- Hold the phone parallel to the film, flash off. Use a stack of books or a stand so it doesn’t move between frames.
- Fill the frame and focus. Tap on the image to focus. On phones with a macro mode, it lets you get closer to a 35mm frame. Lock exposure if your camera app allows it, so every frame is shot the same way.
- Take each frame, sliding the strip along in the holder.
How to invert a negative into a positive
The photo you just took is still a negative. Here are the ways to turn it into a positive, from quickest to best.
- Just to look: on iPhone, Settings > Accessibility > Display & Text Size > Classic Invert flips every color on the screen, so you can see a negative as a positive in the Camera or Photos app. It doesn’t change the file. Android has a similar Color inversion switch under Accessibility.
- With a photo editor: in Lightroom mobile’s tone curve, drag the bottom-left point to the top and the top-right point to the bottom. That inverts the image, and you can then adjust white balance and exposure as usual.
- With a film app: FilmLab shows a live positive preview through the camera and converts color negatives, black and white and slides. FilmBox by Photomyne is another app for this.
- On a computer: darktable is free and has a module for converting negatives. Negative Lab Pro is a paid plugin for Lightroom Classic that many film photographers use.
Black and white vs color negatives
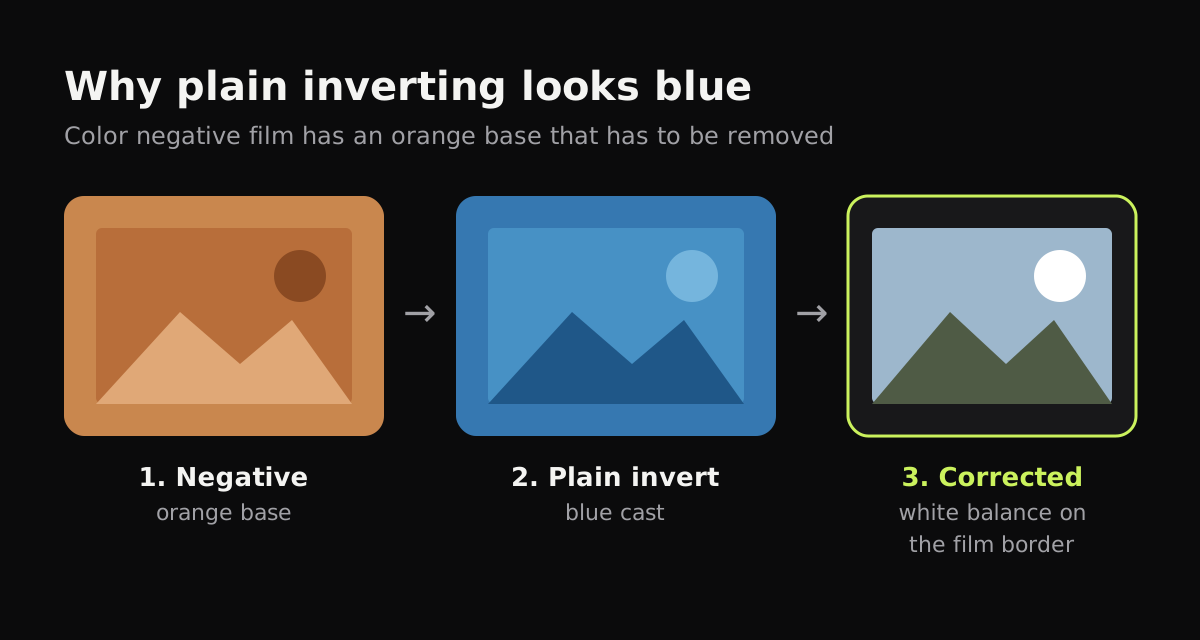
Black and white negatives are easy: invert, then adjust contrast. Color negatives have an orange base, which turns blue or cyan when you invert. To fix it, set the white balance on the clear border between frames, which is pure film base, before inverting, or let a film app do the conversion. A plain invert from Classic Invert or a quick curve will always look a bit blue.
Film formats and how much detail to expect
Film frames are small, so you’ll fill the phone’s frame with only a few square centimeters. This table gives the frame size of common formats.
| Film | Frame size | Notes |
|---|---|---|
| 35mm | 36 × 24 mm | The most common format; get as close as your camera can focus |
| 120 medium format, 6×6 | about 56 × 56 mm | Square; easy to scan on a phone because the frame is bigger |
| 120 medium format, 6×7 | about 56 × 70 mm | Very good results even from a phone |
| 110 | 17 × 13 mm | Tiny; needs a macro lens or macro mode |
| Slides (positive film) | 36 × 24 mm in a 50 mm mount | Already positive; skip the inverting step |
A phone photo of a 35mm negative won’t match a dedicated film scanner for fine grain. For screens, social media and prints up to about postcard size it’s usually fine.
When to use a film scanner or lab instead
- You have hundreds of rolls. Phone scanning is quick per frame, but setting up each strip adds up.
- You want big prints. A dedicated film scanner or a lab scan captures far more detail than a phone.
- The negatives are damaged or very dense. Labs and scanners with infrared dust removal can clean up scratches on color film.
Labs that develop film usually offer scanning of existing negatives too. Ask what resolution you get, and whether the files are JPG or TIFF.
Tips for cleaner negative scans
- Handle film by the edges only. Fingerprints are permanent on the emulsion.
- Shoot a whole strip before you change any settings, so the frames match.
- Keep the original phone photos. Inverting again later with a better tool is easy if you still have them.
- Store negatives in archival sleeves, away from heat and damp.
If you also have prints from the same rolls, scanning the prints may be faster: see how to scan photos and, for iPhone users, how to scan photos on iPhone. For instant film, how to scan Polaroids covers the glossy surface and small size.
Questions
Can you scan negatives with a phone?
Yes. Put the negative on an even white light such as a tablet screen or LED light pad, photograph it with your phone held level above it, and invert the image in an app or photo editor.
How do I turn a negative into a positive on my phone?
Use a film scanning app such as FilmLab, which inverts the image for you, or open the photo in an editor with a tone curve such as Lightroom mobile and drag the curve's ends to swap black and white.
Why do my inverted color negatives look blue?
Color negative film has an orange base. Inverting it turns the orange into blue. Set the white balance on the clear film border before inverting, or use an app made for color negatives, which removes the orange mask.
What can I use as a light source for scanning negatives?
A tablet or second phone showing a plain white screen at full brightness, a cheap LED tracing light pad, or a bright window covered with white paper. The light should be even and larger than the negative.