 COPIER
How to Convert a Photo to PDF on iPhone
To convert a photo to PDF on iPhone, open it in Photos, tap Share, then Print, and pinch outward on the preview: it opens as a PDF you can save to Files or send. To combine several photos into one PDF, select them in Files and choose Create PDF. Both are built into iOS 26 and free. Below are those two and three other ways, and when it’s better to scan the paper instead.
Ways to save a picture as a PDF on iPhone
Each route below makes a real PDF. They differ in how many photos they take at once and whether you can set the page order.
| Method | One photo | Several photos | Set the page order | Where the PDF goes |
|---|---|---|---|---|
| Photos › Print | Yes | Yes | Order you select them in | Files, or wherever you share it |
| Files › Create PDF | Yes | Yes | By file name | Same folder as the photos |
| Preview › Export | Yes | Add pages with Insert from File | Drag pages to reorder | A file in Files |
| Shortcuts › Make PDF | Yes | Yes | Order passed to the shortcut | Wherever the shortcut saves |
| Share to Books | Yes | Yes | Order you select them in | Books library |
1. Photos: Print to PDF
This works for one photo or a handful, without leaving Photos.
- Open Photos and open the photo. For several, tap Select and tap each one in the order you want.
- Tap Share, scroll down, and tap Print.
- On the print preview, spread two fingers apart on the page. It opens full screen as a PDF.
- Tap Share and choose Save to Files, or send it straight to Mail or Messages.
Each photo becomes its own page. You can’t reorder them once the print screen is open, so select them in the right order to begin with.
2. Files: Create PDF (the best way to combine photos into a PDF)
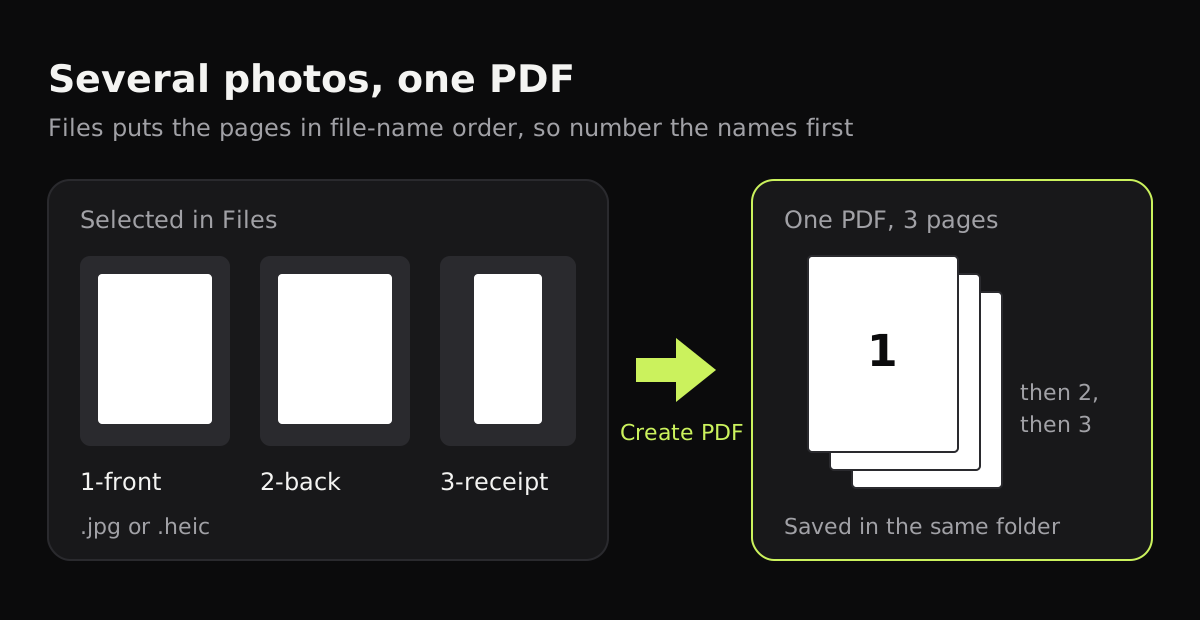
If you’re combining photos into one PDF and the order matters, Files is the easiest tool, because the order follows the file names.
- In Photos, select the photos, tap Share, and choose Save to Files. Pick or make a folder.
- In Files, open that folder. Rename the photos if needed so they sort in order, for example “1-front”, “2-back”, “3-receipt”.
- Tap the More button (⋯), tap Select, and select the photos.
- Tap the More button at the bottom right, then Create PDF.
The new PDF appears in the same folder. For a single image, touch and hold it and choose Quick Actions > Create PDF.
3. Preview: Export a JPG as a PDF
Preview came to iPhone with iOS 26 and handles one image well.
- Open Preview and open the photo.
- Tap the Actions Menu button next to the file name, then Export.
- Choose PDF as the format.
To add more images, open the PDF in Preview, tap the page count to show thumbnails, touch and hold a thumbnail, and tap Insert from File. You can drag thumbnails to reorder pages and delete any you don’t want, which makes Preview the most flexible way to convert JPG to PDF on iPhone when the pages need arranging.
4. Shortcuts: Make PDF
If you turn photos into PDFs often, build a shortcut in the Shortcuts app with the Make PDF action, followed by an action that saves the file. Turn on the option to show the shortcut in the share sheet. After that, select photos in Photos, tap Share, and run the shortcut.
5. Share to Books
Select photos, tap Share, and choose Books (it may be under More). Books saves them as a PDF in its library. It’s fine for keeping something to read, but Files is a better place for a document you’ll send.
Photo or scan: which do you need?
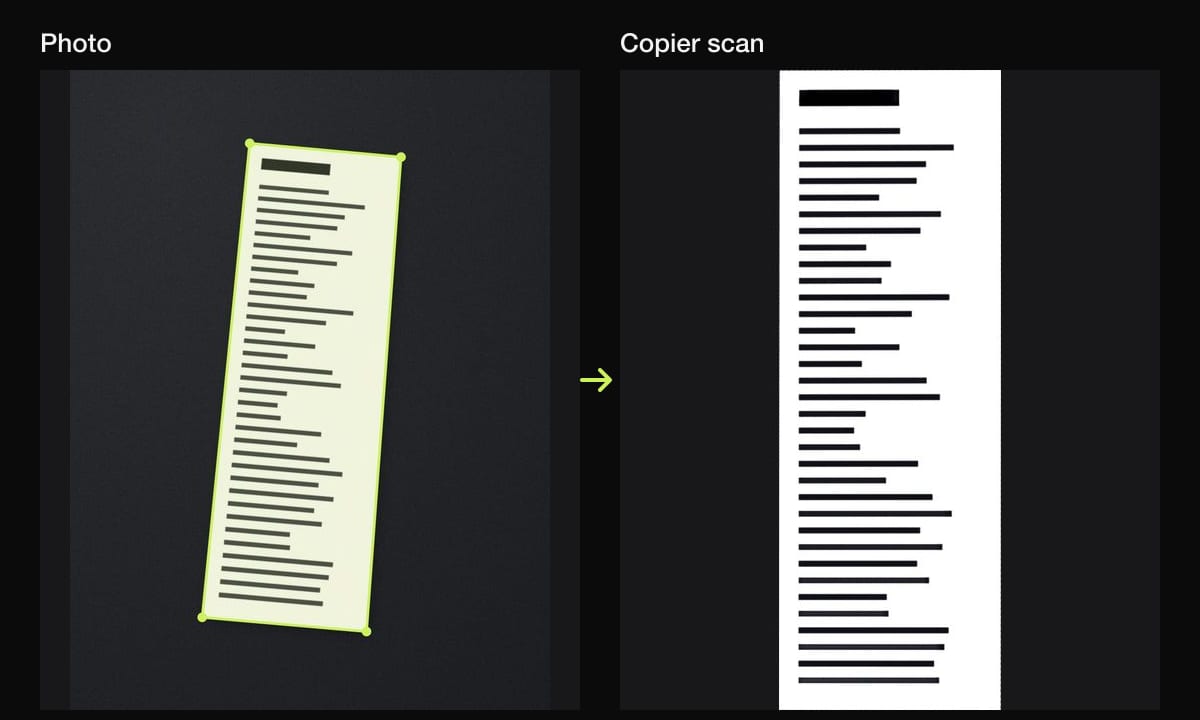
Converting a photo to PDF wraps the photo, as it is, in a PDF. If the photo is of a document, the desk around the page, the tilt and the shadow from your phone all come along into the PDF.
For documents, a scanner does better. It finds the page’s edges, straightens it, and evens out the light so the paper comes out white. The iPhone’s own scanner in Files and Notes does the basic version; how to scan documents on iPhone has the steps.
Copier can also import photos you’ve already taken, so a document you photographed last week can still become a clean page. Each photo is found, cut out and straightened on the phone, and the Auto look removes shadows and color casts. A curled receipt is straightened along its curved edges as well as at the corners.
Copier shares pages as JPG for free, and as a multi-page PDF with Copier Pro, a one-time purchase. It puts each page on an A4 sheet in the PDF, turned landscape for wide pages. There’s no account and nothing is uploaded.
Tips
- Pick photos in order before tapping Share in Photos, since the print screen keeps that order.
- Number the file names (1, 2, 3) before using Create PDF in Files.
- For a document, scan it rather than photographing it; see how to save a picture as a PDF for the same job on other devices.
- If the PDF is too big for email, scan text pages in black and white instead of converting color photos. How to make a scanned PDF smaller has more.
- Many pages of a paper document? Scanning multiple pages into one PDF is faster than photographing each one.
Questions
How do I convert a photo to PDF on iPhone without an app?
Open the photo in Photos, tap Share, then Print, and pinch outward on the preview. It opens as a PDF; tap Share and choose Save to Files.
How do I combine several photos into one PDF on iPhone?
Save the photos to a folder in Files, tap the More button, then Select, choose the photos, tap the More button again and tap Create PDF. The pages follow the file names.
Does converting a photo to PDF lower the quality?
No. The PDF holds the photo as an image, so it looks the same. It doesn't straighten or clean up the page; a scanner does that.
Can I convert a HEIC photo to PDF?
Yes. Print, Create PDF in Files and Preview all accept HEIC photos, which is the iPhone's usual format, as well as JPG and PNG.